Discover how to reduce your cloud costs and optimize your Kubernetes cluster with the powerful Descheduler tool. In this blog post, you will learn about the key features of Descheduler and how it can be used to relocate Pods onto more appropriate Nodes based on specific strategies. I will walk you through a real-world example that showcases how to integrate Descheduler into the autoscaling configuration of a Google Kubernetes Engine (GKE) cluster. By the end of this post, you will have a solid understanding of how to leverage Descheduler to boost the efficiency of your Kubernetes cluster and save money on your cloud bill.
Table of Contents
Descheduler for Kubernetes
The kube-scheduler is the default scheduler for Kubernetes and an essential component of the Kubernetes control plane. Its primary task is to schedule Pods onto Nodes based on a scoring system that takes into account factors such as resource requirements, affinity and anti-affinity specifications, and data locality. The kube-scheduler picks the Node with the highest score among the feasible Nodes to run the Pod and informs the API server about this decision. This decision is the best option from the kube-schedulers point of view at this particular moment. However, as conditions can change over time, the decision made by the kube-scheduler may not continue to be the best option for the Pod. This is where Descheduler comes into play.
The Descheduler is mainted by SIG Scheduling and part of the Kubernetes open soure project. It can evict already scheduled Pods from their Nodes and enforce a re-scheduling. You might wonder: Why should I evict an already scheduled Pod? Some of you might be familiar with live-migration of VMs (like vMotion for VMware ESX). However, there is no such thing like live-migration for Pods (at least not out-of the box), because your containerized application typically don’t need it! If you are running mission-critical workloads, you should ensure that you are running more than one pod. Kubernetes provides built-in mechanisms for that, such as Deployments and PodDisruptionBudgets, which make it easy to guarantee a minimum number of pods are available at all times. Therefore, I think its perfectly reasonable to consider using the Descheduler to evict a running Pod and re-schedule this Pod to a different Node that fits better than the current Node the Pod is residing on.
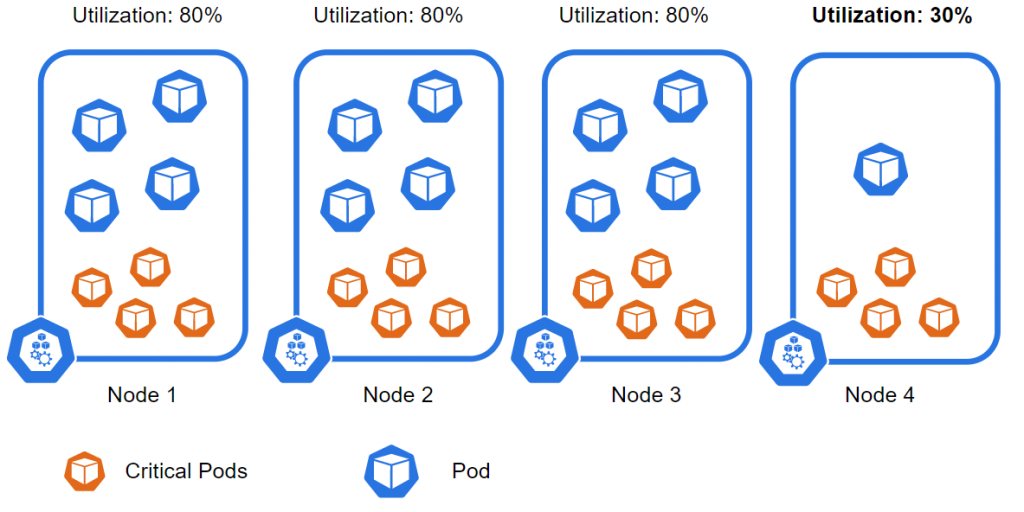
Use Cases
Since Kubernetes clusters are constantly changing and evolving, it may become necessary to relocate running Pods to different Nodes within the cluster for a variety of reasons:
- Node Utilization: Some Nodes are under or over utilized
- Node failure: Some Nodes failed and their Pods moved to other Nodes
- Cluster scaling: New Nodes are added or existing ones are removed from the cluster
- Violation of scheduling decisions: Taints or Labels are added to or removed from Nodes, Pod/Node affinity requirements are not satisfied any more
As a result, it’s possible for some Pods to be assigned to Nodes in a cluster that are not ideal. Descheduler identifies these Pods and relocates them onto more appropriate Nodes based on specific strategies.
Configuration
The Descheduler can be deployed quite easily in your Kubernetes cluster as a Job, CronJob, or Deployment by Kustomize or Helm. The Descheduler Pod is run with a “system-cluster-critial” priorityClassName property in the kube-system namespace to avoid being evicted by itself or by the kubelet. I will give a real world example of how the deployment works and how it be configured later on.
⚠️⚠️⚠️ CAUTION: At the time of writing this blog post, many examples or even the deployment specifications of Descheduler on the Descheduler GitHub still reference the v1alpha1 DeschedulerPolicy specification. While the v1alpha1 configuration is still supported, it is now deprecated and will soon be removed. Therefore, I will use the v1alpha2 specification throughout this blog post.!!! ⚠️⚠️⚠️
The configuration of the Descheduler is pretty simple. Its is done by by modifying the ConfigMap which is part of the Descheduler deployment (see descheduler/configmap.yaml at master · kubernetes-sigs/descheduler (github.com)). With this policy you can tell Descheduler exactly which strategy to use for evicting Pods. Here is a sample DeschedulerPolicy (v1alpha2 configuration):
A DeschedulerPolicy is made of a top level configuration and list of profiles. In the top level configuration you configure some base settings for the eviction process like maxNoOfPodsToEvictPerNode. Despite you can specify multiple profiles you typically only need one profile. Besides the profile name a profile consists of a list of plugins and another list that encompasses the configuration of these plugins.
When using the Descheduler you need at least two plugins. One Evictor Plugin and one or more Strategy Plugins. The Evictor Plugin is used for filtering, sorting, validating and grouping Pods by different criteria before applying a strategy plugin. You can either use the Default Evictor Plugin as part of Descheduler or create a custom Evictor plugin.
In contrast to that the strategy plugin defines the criteria on which Pods are chosen for eviction. There are two types of strategy plugins: Deschedule and Balance Plugins. Deschedule Plugins process Pods one after another, and evict them in a sequential manner. Whereas Balance Plugins process all or groups of Pods, and determine which Pods to evict based on how the group was intended to be spread. You can find a full list of all currently available strategy plugins including a sample in the official docs.
What you need to know before you start
- ⚠️The configuration for DeschedulerPolicy
v1alpha1is still supported, but it is deprecated and will soon be removed. It is recommended to usev1alpha2instead!!! ⚠️ - Descheduler takes into account the priorityClass when evicting Pods from a high-loaded Node (see Priority filtering)
- Critical Pods, identified by
priorityClassNameset tosystem-cluster-criticalorsystem-node-criticalare never evicted. - Pods that are associated with a DaemonSet or not controlled by any controller are not evaluated for eviction.
- The best effort Pods are evicted before burstable and guaranteed ones
- If a Pod Disruption Budget (PDB) is in place, then any pods that fall under its scope will not be forcefully removed if descheduling action would cause a violation of the PDB.
- A ServiceMonitor for Descheduler provides metrics for monitoring Pod evictions performed by Descheduler.
- You may need to adjust your monitoring to prevent false alerts due to Pod evictions by Descheduler.
- Compatibility to the Kubernetes Cluster version: Beginning with the release v0.18 of descheduler, its minor version will correspond to the minor version of the k8s client packages that were used to compile it. At this time descheduler does not have a hard dependency to a specific k8s release!
Example: Creating a DeschedulerPolicy to reduce your cloud costs
In this example, I will showcase how to use Descheduler to reduce your cloud costs by leveraging the HighNodeUtilization balancing strategy. I will demonstrate how to integrate Descheduler into the autoscaling configuration of a Google Kubernetes Engine (GKE) cluster. The Descheduler configuration will evict Pods from underutilized Nodes, allowing the cluster autoscaler to remove them. At the end of the day, this can save you a lot of money depending on your cluster size.
Requirements
- A Kubernetes cluster with a proper autoscaling configuration that removes low utilized Nodes
- A functional Descheduler deployment
- DeschedulerPolicy with balance strategy HighNodeUtilization to ensure optimal resource usage
How it works
Our goal is to remove underutilized Nodes from our Kubernetes cluster. To achieve this, we can use the DeschedulerPolicy HighNodeUtilization, which evicts Pods from Nodes with low utilization. But wait a moment… It is very likely that the kube-scheduler might reschedule some of the evicted Pods back to the Nodes we’re trying to remove, because its default configuration has the NodeResourcesFit scheduling plugin set to the LeastAllocated strategy. To prevent this, we must adjust the kube-scheduler scoring strategy to use the MostAllocated strategy for the NodeResourcesFit scheduling plugin. Therefore, it’s crucial to use the DeschedulerPolicy with the HighNodeUtilization balancing strategy in conjunction with this kube-scheduler configuration change. Otherwise it will not work as intended!
Changing the default scheduling behavior is a straightforward process if you have full access to the control plane of the Kubernetes cluster. You can customize the behavior of the kube-scheduler by writing a configuration file (as shown above) and passing its path as a command line argument. However, if you’re using a managed Kubernetes offering from a public cloud provider, you may need to check their docs to learn how to make this configuration change:
- Google Kubernetes Engine (GKE): In GKE you need to use the autoscaling profile
optimize-utilization. When enabled, GKE will prioritize scheduling Pods on Nodes that already have high allocation of CPU or memory. - Azure Kubernetes Service (AKS): AKS allows to customize the scheduler configuration by some extend.
- Amazon Elastic Kubernetes Service (EKS): At the moment there is no option for kube-scheduler customization in EKS (see here). If EKS won’t allow you to modify the default kube-scheduler deployment, you may need to run a custom scheduler.
Step-by-Step Guide
1. Command for creating GKE cluster with proper autoscaling configuration
First of all, we will create a GKE cluster with autoscaling enabled and the optimize-utilization autoscaling profile.
gcloud container clusters create test-thomas \
    --num-nodes=2 \
    --zone=us-central1-a \
    --node-locations=us-central1-a,us-central1-b \
    --enable-autoscaling --min-nodes=2 --max-nodes=5 \
    --autoscaling-profile optimize-utilization
2. Running Descheduler with HighNodeUtilization strategy as CronJob
To run Descheduler as a CronJob, follow the steps provided in the official docs. I just made the following small adjustment in the configmap.yaml in order to activate only the HighNodeUtilization strategy.
kubectl create -f kubernetes/base/rbac.yaml
kubectl create -f kubernetes/base/configmap.yaml
kubectl create -f kubernetes/cronjob/cronjob.yaml
The commands above will install Descheduler as a CronJob in your cluster that runs every 2 minutes. During this interval, it analyzes the current state of your cluster and applies the DeschedulerPolicy with the HighNodeUtilization strategy. Please choose your thresholds carefully and align them with the settings of the autoscaler. Our goal is to remove Pods from underutilized Nodes so that the autoscaler can kick in and remove those Nodes.
3. Watch Descheduler in action
The CronJob resource is active in the kube-system Namespace:

You find the Pods created by the latest Job runs in the kube-system Namespace as well:

With kubectl logs pod/<pod-name> you can retrieve the Pod logs of the Descheduler run and check what Descheduler actually did during this run:
The logs above show that Descheduler first calculates the current Node utilization (lines 12-16) and compares the result to the threshold defined previously in the DeschedulerPolicy with the HighNodeUtilization strategy (line 17). In this particular run, it identified two Nodes below the given threshold and evicted a total of two Pods from those Nodes to meet the strategy. The evicted Pods will then get rescheduled onto higher-utilized Nodes because of our autoscaler profile, optimize-utilization. This means that the autoscaler can kick in and remove the low-utilized nodes, which effectively means lower costs in our cloud bill at the end of the month 🙂